We have provided you with a preconfigured workspace named "Sample Home". This workspace contains the following five layers (the five pictures in this sample workspace are embedded within the database file): 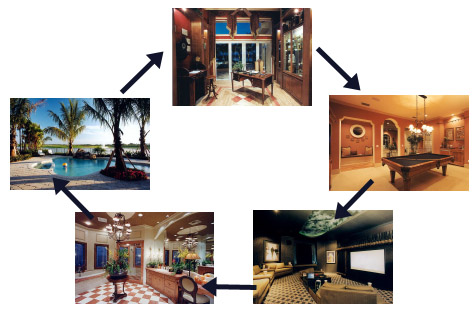 Launch VisiLaunch and open the workspace named "Sample Home". The VisiLaunch Tool will automatically be in "Run" mode, so you can immediately navigate through your "home". Anytime you see the cursor change to a pointing hand, you know you are over a link. For the sample home, the only links we have set are other layer links. It is up to you to setup other types of links within each of your "rooms".
The VisiLaunch Tool is the key to creating links in any room (on any picture): 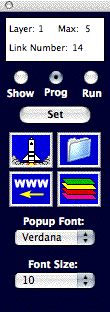 The top display area in the tool provides you with link and layer information. Specifically, the current Layer number, the Maximum number of layers in this workspace, and the number of Links within the current Layer. VisiLaunch permits you to create up to 100 links within each Layer. The number of Layers is limited only by hard disk space (practically unlimited). Below the information display area there are three radio buttons: Show, Prog (Program), and Run. When the "Show"
radio button is selected, VisiLaunch will highlight
every link rectangle within the current Layer.
Double clicking in one of the highlighted
rectangles will provide you with the details of
each link associated with this area. In this manner
you can readily delete links. When the "Prog"
radio button is selected, you can program links in
the main picture. You do this by dragging out a
rectangle within the picture over an area, choose a
link type, then click the "Set" button. IF a link
is already set for a specific area of a picture,
you only need to click in this preset area to
highlight it. You can then proceed to add the new
link. When the "Run"
radio button is selected, you can run your linked
workspace. When the cursor travels over a linked
area in the picture, it changes to a pointing
finger type cursor. Clicking in such an area will
present a popup menu from which you can select the
item desired. VisiLaunch will remember the last mode (Show, Prog, or Run) upon quitting and restore this mode after relaunching the application. The following four buttons in the VisiLaunch Tool determine which type of link is being created (in Prog mode). Specifically: Launch
Application or Document. Create this type of link
if you want to launch an application or open a
document in an application when you click on a link
in the picture. Open Folder.
Create this type of link if you want to open a
folder or directory when you click on a link in a
picture. WWW Link. Create
this type of link if you want to open a web page
(or play a remotely hosted QuickTime movie) when
you click on a link in the picture. The page will
be opened in your designated default web
browser. Layer Link.
Create this type of link if you want to create a
completely new layer or link to a previously
created layer. Once you select the button for the link type, and you have dragged out a link rectangle on your picture, you then click the "Set" button. Depending on the link type, you will be presented with appropriate dialog boxes which will ask you to find the document, application, folder, etc. For WWW type links, VisiLaunch will automatically extract the Title and URL from the front most web browser window. You can edit the Title as necessary. This Title will be presented in the popup menu when you run your workspace and click on a link in the picture. The Macintosh version of VisiLaunch also lets you choose the font type and size for the link popup menus. If you close the VisiLaunch Tool window, you can always open it from the Windows menu. VisiLaunch remembers the last state of the VisiLaunch Tool. Hence if you Quit VisiLaunch with the Tool window open, the VisiLaunch Tool will automatically open the next time you launch VisiLaunch. Conversely, if the Tool window is closed upon Quit, the VisiLaunch Tool window will not be open the next time you launch VisiLaunch. Adding a New Link: 1. Make sure the VisiLaunch Tool is in "Prog" mode. You can readily set multiple links for the same link rectangle. Just click the "Set" button again, and once again complete the dialog boxe(es). When you run your workspace, all the links will be presented in a simple popup menu when you click your mouse in the link area. You can mix different link types in the same link rectangle (hence you can have applications, documents, and folders, web pages, etc. linked over the same picture area, if you wish). Deleting an Existing Link: 1. Make sure the VisiLaunch Tool is in "Show" mode. That's it. The selected link has been delelted. You can also get complete path details on any link by double clicking a link in the Link Details list box. Hint: If you later want to add a link to some pre-existing link rectangle, just click the mouse over the desired picture area while the VisiLaunch Tool is in Program mode. The link rectangle will automatically highlight and you can then proceed to add the link. Hint: You do NOT always have to return the VisiLaunch Tool to Program mode in order to add a new link to a pre-existing link area. While the VisiLaunch Tool is in Program mode, move the mouse over a pre-existing link area in the picture, and click the mouse down. You should see a popup menu appear with one or more items. Now hold down the "Control" key on your keyboard and select one of the items in the popup menu. Depending on the type of link you selected from the Popup menu, you will be presented with the appropriate dialog box(es). Complete the dialog box(es) and your new link will be set. |
