![]()
![]()
|
|
|
|
|
|
|
|
|
|
||||||||
|
|
||||||||
|
|
||||||||
|
|
|
||||||||||||||||||||||
|
Getting
Started Windows Help Release
Notes
|
Getting Started You do NOT have to restart your machine after installation of VisiLaunch. Launch VisiLaunch. Open the workspace named "Sample House" if you wish to start with a preconfigured workspace containing five layers of various areas of a "virtual house": 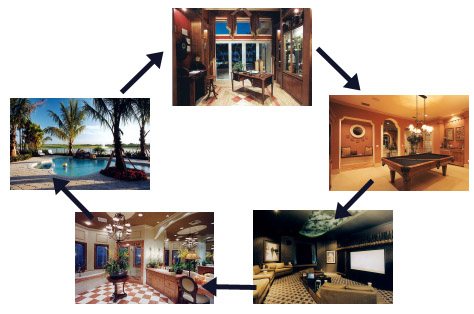 If you wish to create your own workspace, the first thing you will want to do is open a picture, behind which you can create your links. You do this by selecting the "Load Picture..." item beneath the File menu.
Once a picture (or workspace) is loaded, you begin to create your links. You do this by setting the VisiLaunch Tool to programming mode by clicking on the "Prog" radio button in the VisiLaunch Tool. Then you drag out a rectangle over a portion of the picture where you wish to create a link. You can reposition the rectangle by clicking within the rectangle and dragging it to a new location. You can also resize it by clicking in the bottom right hand corner and dragging this corner to a new position. Clicking on any area of the picture outside the rectangle will clear the rectangle from the picture. With your link rectangle properly positioned and sized, click the desired link type button in the VisiLaunch Tool. You can select from a Launch or Open type link, a Folder (Directory) open link, a WWW type link, or a new Layer type link. Finally, click the "Set" button in the VisiLaunch tool to set the application, document, movie, folder, WWW link, or the new Layer. You will be presented with a dialog box that will let you set the proper parameters for this link. (note that VisiLaunch extracts the current URL information from your running browser to fill in the URL properties of a WWW type link).
Congratulations! You have just created your first link. You can now repeat this process as needed. Note that you can create multiple links behind the same rectangle by simply selecting the desired Link type and then clicking the Set button. If the rectangle has been reset (does not show), just move the cursor over the link area and click your mouse. This will make the rectangle reappear (so that you can easily add other links at some later time). If you wish to move to another new "layer" (picture), just create a new Layer Link.
You can also use the built-in QuickTime player to play movies directly in a picture. The area you drag out for the link will also become the area used by the QuickTime movie player. The following movie shows a link being created for a movie hosted by a remote web site. The URL and Title which are "pulled" into the VisiLaunch dialog box is the front window of the active browser (i.e. Internet Explorer, Safari, etc.). This is true for all WWW links. Note that you can change the name of the link (Title) as they will appear in the VisiLaunch popup menus.
Once you have your links created, put the VisiLaunch tool into "Run" mode by clicking on the "Run" radio button. Move the mouse around the picture, going over various link areas you may have created. You will note that the cursor changes to a "Hand Pointer" when the cursor is over a link area. Click the mouse in such a link area. You will see a popup menu. At this time you have two options: a. you can choose any item in the popup menu to launch or open the link. b. you can hold down the "Shift" key on your keyboard and choose any item in the popup menu to launch or open ALL items in the popup menu. There are a few special cases where you may not see a popup menu or you can only open one item in the popup menu: a. If there is only one link for a new Layer link, you have the option NOT to display the link in a popup menu. This option is set when you create a new Layer link. b. If you have several QuickTime movies linked within the integrated QuickTime player, you can only select one link. QuickTime does not permit the playing of multiple movies at the same time. After you have all your links established, you can save your "Virtual World" to its own file. VisiLaunch will open this file automatically the next time you launch VisiLaunch. Note: when you create a new "Virtual World", all the link and picture info is automatically stored in the file "Temp_VI_Database" as each link or layer is added to your workspace. In this manner, even if your machine crashes, your VisiLaunch information will not be lost. You can always save your VisiLaunch database to a new file using the "Save Workspace As..." item under the File menu. There is much more you can do with VisiLaunch. Please refer to the "Visilaunch Help" page which can be accessed from the Help menu for more information.
|